Wednesday, December 7, 2011

Holly-Jolly without the Belly like Jelly! Delicious, Festive Gingerbread Cookies!

Christmas is that special time of year when social obligations lead us down a magical month-long path of sensory over-stimulation, taffeta, and gastronomical overindulgence.  But whatever your opinion on Griswold-style lighting and exaggerated costume, it can be agreed that food is the main attraction.  All of those wonderful things we know not to eat the rest of the year are suddenly everywhere and at our fingertips.  Molten brie cheese topped with brown sugar, fruitcake, fatty preserved meats, buttery crackers topped with more cheese and meat, pecan pies and sugar cookies are the fare of the day, and if one is as lacking in self discipline as I am during the holiday season, this can only mean one thing: you’re going to eat a lot of crap and that crap is going to accumulate in pockets around your midsection and/or thighs.

Now, I would never ask that someone not go a little overboard during the holidays – after all, its tradition.  However, a streetwise raw-foodie has a little extra piece of Christmas, Kwanza, Ramadan, Chanukah, or Solstice magic that the rest of the population does not: that is, we can have our cake and eat it too!  The internet is loaded with raw deserts and treats, pretty much all of which are going to be healthier for your “bottom-line”.  Moreover, I enjoy the raw desserts more than traditional sweets because they are not loaded down with as much sugar as the recipe can hold – for people who eat healthy on a regular basis, one sugar cookie can recall the time back when you snuck into your Halloween stash and tried to eat the whole thing, stopping only when the nausea began to dominate the experience. 

Finally, an additional and perhaps surprising plus to raw deserts is they are easier to make than baked goods.  Most deserts only require blending via food processor and maybe some dehydrating, which brings me to the purpose of this post; my favorite holiday delight, the gingerbread man!  For me, it would not be the holidays without aggressively biting the head off a spiced, baked human effigy.  Thus, with a twinkle of my nose and a sparkle in my spoon (whatever that all means), I plundered my pantry for all the right fix’ns to make quick, delicious holiday magic.  These cookies have a true gingerbread taste and a cookie-like texture, and I did not hold off on any of the traditional zing!  The dough can also be rolled out and cut with cookie-cutters, and the resulting cookies can even be decorated.  Best of all, prep time can be as low as five minutes!  So go ahead and indulge – ‘tis the season!           


Gingerbread Cookies
Makes 10-12 small round cookies

1 c almonds
½ c pecans
3 Tbsp maple syrup
2 Tbsp chopped dried fig
1 tsp molasses
2 tsp fresh grated ginger
2 tsp ground ginger
1 tsp cinnamon
¼ tsp each of the following:
                ground clove
                nutmeg
                ground cardamom

1.    Place all ingredients into a food processor and blend until mixture is as smooth as it can get
2.    Using a spoon, scoop dough into 10-12 separate chunks, form each into a ball, then flatten each ball into a disk about ½” thick, OR: roll out entire portion of dough until it’s about ½” thick and cut shapes from it using cookie cutters
3.    Place rounds or shapes onto dehydrator trays and dehydrate for about 5-6 hours.  Cookies should be somewhat firm and no longer sticky to the touch.
Sunday, July 3, 2011

Eat like a Market Starlet


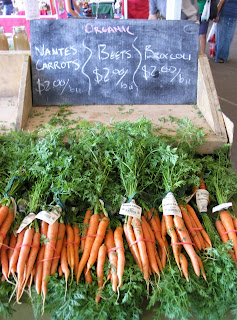
Perhaps market harlot would be a better way to describe someone who has a ravenous, insatiable need to shop local farmers markets for fresh and delicious produce, but I suppose the term starlet is satisfactory.  Much has been said over the last decade about the benefits of shopping and eating local farmers markets.  True, if you eat and shop local it benefits the environment, supports local economy and agriculture, promotes better health through fresher, more nutrient rich food, etc., etc… but what I am most interested in as a raw foodist is the fact that fruits and vegetables from local markets simply taste better.

My lovely friend Irene playing with the bulbs.
Case in point: the summer squash.  One of my favorite dishes was summer squash sautéed with onion and butter, but as much as I enjoyed this dish, I never found raw squash to be very palatable.  Most squashes, as they mature on the vine, become tougher, woodier, and inevitably taste more… well, squashy.  This is how the larger (6+ inch) squashes sold in most supermarkets tend to be.  At the farmers market however, one can find the younger, more tender and sweet summer squash that makes a delicious addition to any salad or dish (see Summer Squash Salad below).  Additionally, root vegetables, such as beets and turnips, may not even be digestible in uncooked form unless they are young, fresh and tender (beet recipes promised for the fall!). 


This phenomenon of fresher=tastier also holds true for fruit.  For the longest time I quit buying peaches, nectarines, apricots, and oranges at the store because they never tasted right.  This is mainly because pretty much any fruit sold in a supermarket has to be picked very young in order to prevent bruising in transport, and oftentimes they are sprayed upon arrival with a chemical that initiates further (“vine-less”) ripening.  The result is fruit that is frequently starchy, mealy, less sweet and less flavorful.  At my trip to the market this morning, I was delighted by a nectarine so perfect that I couldn’t take even a single bite without juice dripping down my wrist and chin!  I had to lean far forward and eat it over several napkins!  Now that’s what I call a fruit!

If you’re asking yourself when was the last time you had a sloppy fruit encounter, then here’s what I suggest you do: go online and search the name of your city/town with the term “farmers market” - you may be surprised by how many are offered in your area.  Most markets operate from early in the morning until about noon or 1pm, and most only take cash (bring plenty for your first trip!).  If you’re after the cream of the crop, go early.  If however, you prefer good bargains over pretty produce, then hit up weekly markets about an hour prior to closing.  The vendors at weekly markets know that most of what they don’t sell by the end of that day will go to waste, thus they practically give their delicious inventory away within that last hour.  

Finally, since produce from farmers markets is so fresh, letting it sit in your fridge as long as you might let grocery store produce sit in your fridge is a bad idea.  Depending upon what type of food item you purchase (peaches vs. onions for example), you may find it turning south within a day or two.  If you need to move some food, get to eating, dehydrating, or bring over some friends for an actually delectable veggie dish.  No matter what you chose to do with your food from the farmers market, I promise you’ll keep coming back for more!

Summer Squash Salad
Serves 1-2

6-8 young summer squash (approx. 2 c chopped)
1 c sweet cherry tomatoes, halved
1 heaping Tbsp fresh chopped basil
1 Tbsp capers
1 large garlic clove, crushed
1 Tbsp fresh lemon juice
1 ½ Tbsp olive oil
pinch ground fennel seed
pinch red pepper flakes (optional)
salt and cracked black pepper to taste

1.  Prepare squash, tomato, and basil as described and place in medium sized serving bowl along with capers.
2.   Mix remaining ingredients together in a separate bowl and pour over squash medley to serve.  

Saturday, June 18, 2011

Cuckoo for Coconuts


In one of the courses I teach for a living at a career school, I introduce my students to the concept of scotomas.  A scotoma is a blind spot in one’s vision caused not by a malfunction in the eye, but rather by the brain’s seeming unwillingness to register the thing you are looking directly at or for.  You may also carry a scotoma towards a concept or idea, but the whole point is that you don’t know you have one until it’s gone – and everyone has them.  A relatively banal example is the dreaded car keys scotoma: you’re running late, and after a frantic search in which you up-heaved couch cushions, furniture, laundry and bedding, you find the keys sitting right where they belong or worse, in your hand (evocative of my average morning).

So it was that I discovered I had a coconut scotoma.  For nearly two years I had ignored raw recipes that called for young coconut because I was under the impression that they were not sold in my area.  This is because I was looking for big, green husked orbs like one sees hanging from the palms – a far cry from what they actually look like in the store.  I guess I had gotten this idea from a photo I had seen when I was younger of a vendor selling them that way on a beach.  The really sad thing is that I had actually seen young coconut in the store before, but I had passed them by thinking they were something else – perhaps some oddly prepared monster jicama?  Who knows…  

If there’s any preventing a scotoma, it’s first by ridding one’s self of as many assumptions as possible, and second, by arming one’s self with knowledge.  Thus here is the skinny so that one may not, like me, be a fat-head:

Young coconuts are sold in the refrigerated produce section of many grocery stores.  The green husks have been shaved off, leaving behind white pith shaped into a cone-topped cylinder.  You wouldn’t want to take the husk off yourself – it would require a machete and for most of us, a trip to the ER.  Coconuts in this form are highly perishable – many will not last in the fridge for longer than two or three days.  While opening the young coconut can be intimidating at first, by the second or third try you’ll already feel like a seasoned veteran! 

To open the coconut, take a large chopping knife and shave the rest of the pith from off the top of the coconut (where the cone is), revealing a portion of the wooden shell.  Once this crown is exposed, pummel around its circumference with the blunt end of the knife until the crown pops open.  I have found that the quicker you can rotate the coconut whilst pounding and the crazier you can get your eyes to look while attacking it, the sooner it will crack.  This is why it may be necessary to incorporate a war cry into this task.  I personally prefer “BANZAI!!!” or “FüR VATERLAND!!!”, but I suppose “Remember the Alamo” would work just as well.

Carefully jimmy the crown off the rest of the way with the sharp end of your knife, taking pains not to spill much of the delicious coconut water.  Pour the water into a glass and gently harvest the coconut meat with a downturned spoon.  The meat should peel off in a few large chunks.  Discard the shell and pick off any pieces of woody shell lining that may still be attached to the coconut meat.  Once you have accomplished this, the coconut is your oyster!

Tuesday, May 31, 2011

Memorial Day: The Unofficial Start to Burger Season!


Little else says summer quite like a fresh juicy hamburger.  So when I quit eating mammal flesh about two years ago, I knew summers were going to be problematic for me.  I had opted out of mammal meat for a couple of reasons: one, because I didn’t like the idea of eating something I would be unwilling to kill myself; and two, I always felt bloated and lethargic after ingesting red meats.  Getting my body used to new forms of protein was a bit of a challenge of course, but once my body readjusted, my energy level increased, my metabolism sped up, and I dropped about twenty pounds!  That’s what I call a win/win! 

I would never have been able to accomplish this however, if I had simply deprived myself of all meaty comfort foods – especially the burger.  For me the answer was simple: substitution instead of deprivation – a veritable “have my cake and eat it too”!  Thus when my first meatless summer arrived, those greasy hamburger patties of yore turned first into turkey burgers, then into black bean patties, and then finally into the garden burgers that would inspire my raw recipe.  

These raw veggie burgers are probably my all-time favorite creation because they consistently surprise my skeptical meat-loving friends.  No, the patties are not enough to convince them to come to the Dark Side, but they at least get my friends thinking more highly of vegetables.  This is likely due to two things: one, because the raw veggie burgers taste delicious; and two, because this hearty, protein-packed recipe satiates the belly similarly to meat.  The texture is not too far off either, and you can dress these burgers any way you would a beef patty.  Now if only there were a raw version of standing next to a crackling, smoking grill with a cold brew in hand, my summer would be complete!  But trust me: I’m working on this…

Raw Garden Burgers
Makes 6-7 Burger Patties

½ yellow onion
3-4 large garlic cloves, mashed
1 large red bell pepper
1 small to medium yellow bell pepper
1 large carrot
2 large celery stalks
1 ¼ c raw sunflower seeds
¾ c flax meal
2 Tbsp nama shoyu sauce or Bragg’s Liquid Amino Acids
1 ½ Tbsp vegan Worcestershire sauce
1 Tbsp olive oil
1 tsp dark molasses
2-3 drops liquid smoke
¼ tsp of the following:
fresh ground black pepper
paprika
savory or sage
pinch of the following:
                rosemary
thyme
cumin
                cayenne powder
                ground bay leaf
                 
1. Chop vegetables into large chunks and place in food processor.  Pulse the blade a few times in order to make room for remaining ingredients.
2.  Add all remaining ingredients to food processor and blend until sunflower seeds become small pieces.  You may need to take a spoon and scrape bottom and sides of food processor in order to get all ingredients blended well.
3.  Place wax paper or plastic dehydrator sheets on dehydrator racks.  For each patty, scoop ¼ cup of mixture onto covered tray and smooth into a circle about ½” thick.
4.  Dehydrate at 105˚, flipping at least once, until patties are firm and dry to the touch.  This should only take about 4 to 6 hours.
5.  Enjoy patties warm from the dehydrator, or serve later at room temperature.  Store any leftovers for up to a week in the fridge, placing squares of wax paper in between each patty so they won’t stick together.  Reheat patties in dehydrator after refrigerating.

Sunday, May 22, 2011

Victory Dance: Spicy Thai Peanut Sauce!


As you may know, I have been waiting to perfect my Spicy Thai Peanut Sauce recipe until the day I have actual, fresh Thai basil in-hand; regular Italian just wouldn’t do.  Over the course of one month, my quest has taken me to two grocery stores, one co-op, one Whole Foods, two plant nurseries and two Asian marts, all to no avail.  It wasn’t until today that my epic search finally came to an end.

I was rushing home after two teas and an afternoon of errands, when I drove past a tiny Chinese-Korean market that I hadn’t been to in years.  Eager as I was to get home, something about the dingy and dank little place said THAI BASIL SOLD HERE.  I didn’t get my hopes up however - at least not until I was greeted at the door by that cohort of all authentic Asian markets: the wafting, pungent odor of dead sea-life.  Bypassing several isles of brightly colored packaged goods, I headed straight for the produce.  It was there, tucked away in a secret little corner next to some Dali-esque mushrooms and quail eggs, that I finally found a tiny but beautiful bouquet of the coveted leaf.  Conquest was mine!

The short of this story is that I am now able to bring you my recipe for delicious, authentic, chunky Thai peanut sauce!  My favorite thing about this recipe, aside from its captivating flavor, is that it only takes a few minutes to create (not counting the month of ingredient hunting of course).  Plus after having eaten multiple spoonfuls of the stuff, I now believe that even if you don’t use actual raw peanut butter, or have to resort to using regular basil, the recipe should still taste quite fantastic!  I now plan to use it on everything from PB&J sandwiches to salads, to ice cream and crackers.  And in case you were wondering, I will be growing my own Thai basil plant on the living room windowsill.    

Spicy Thai Peanut Sauce

¼ c raw peanut butter
¼ c raw almond, cashew, or hemp seed butter
2-3 Thai red peppers, de-seeded
4-5 large Thai basil leaves, no stem
1 Tbsp sesame oil
1 Tbsp nama shoyu sauce or Bragg's Liquid Amino Acids
1 Tbsp honey
2 medium sized garlic cloves, mashed
1 tsp fresh grated ginger

1. Place all ingredients in a food processor to blend.  You may need to stir sauce and process again in order to break down any large pepper or basil chunks, and to ensure that all ingredients are well combined
2. Serve immediately or store sauce in fridge for up to one week

Saturday, May 21, 2011

Book Review: Ani’s Raw Food Asia


I have been writing raw Asian recipes for some time now, thus I was really nervous when I saw that Ani Phyo would be coming out with a new cookbook titled Ani’s Raw Food Asia.  Why nervous, you may ask?  As silly as it may sound, I was a little apprehensive that some of Ani’s recipes would be too similar to the ones I have developed – after all, there seems to be only so many ways to create a raw version of a particular food.  Nevertheless, after waiting months for Raw Food Asia to finally launch, I Amazon’d the book and found it waiting for me in the stairwell of my fourplex some three days later.

Immediately I flipped to the “wraps” section in order to compare my Thai spring rolls with Phyo’s.  Sweet relief was mine when I saw that, while quite delicious sounding, her spring rolls were nothing like my own!  After having checked the ingredient lists of a few more recipes and finding all but maybe one quite satisfying, I was finally able to relax and enjoy the book that Phyo had undoubtedly worked quite intensely on.

Organization of the book was a little peculiar to me at first.  I had expected that it would be divided by region: Japan here, China there, etc., etc.  Instead there were sections for noodles, wraps and pancakes, rice dishes, soups, and so on.  Nearly every other page hosted a gorgeous full color photograph of either a food dish or a travel scene.  There were so many in fact, that one could easily forget they were reading a cookbook – a far cry from Ani’s first (apparently nervously published) raw-book.

Though the book itself is beautiful and the recipes expertly crafted, I can’t help but find issue with just a few of the book’s features.  Throughout the chapters are scattered essays on life, spirit, and the environment, as well as quick tips and quotes, both of which are accompanied by little category symbols.  While this will not be an issue for most readers, I found it quite distracting when looking at or for recipes.  The more I gave these elements thought however, the more I realized they were quite appropriate.

Ani’s Raw Food Asia is more than a cookbook.  Phyo has done her time sweating over recipes, appeasing publishers, doing TV circuits and news clips – she is now at a place in her raw career where she can write the book she’s always wanted to write.  That is why Raw Food Asia reads more like an essay collage on a holistic, Asian inspired, enlightened lifestyle.  It is a journey into sights, sounds, smells, flavors and sentiments that only a Californian Korean-American like Phyo could impart.  While I would not recommend it as an actual cookbook for new raw foodists, I feel that it is an excellent addition to a raw food library.  Thank you, Ani!